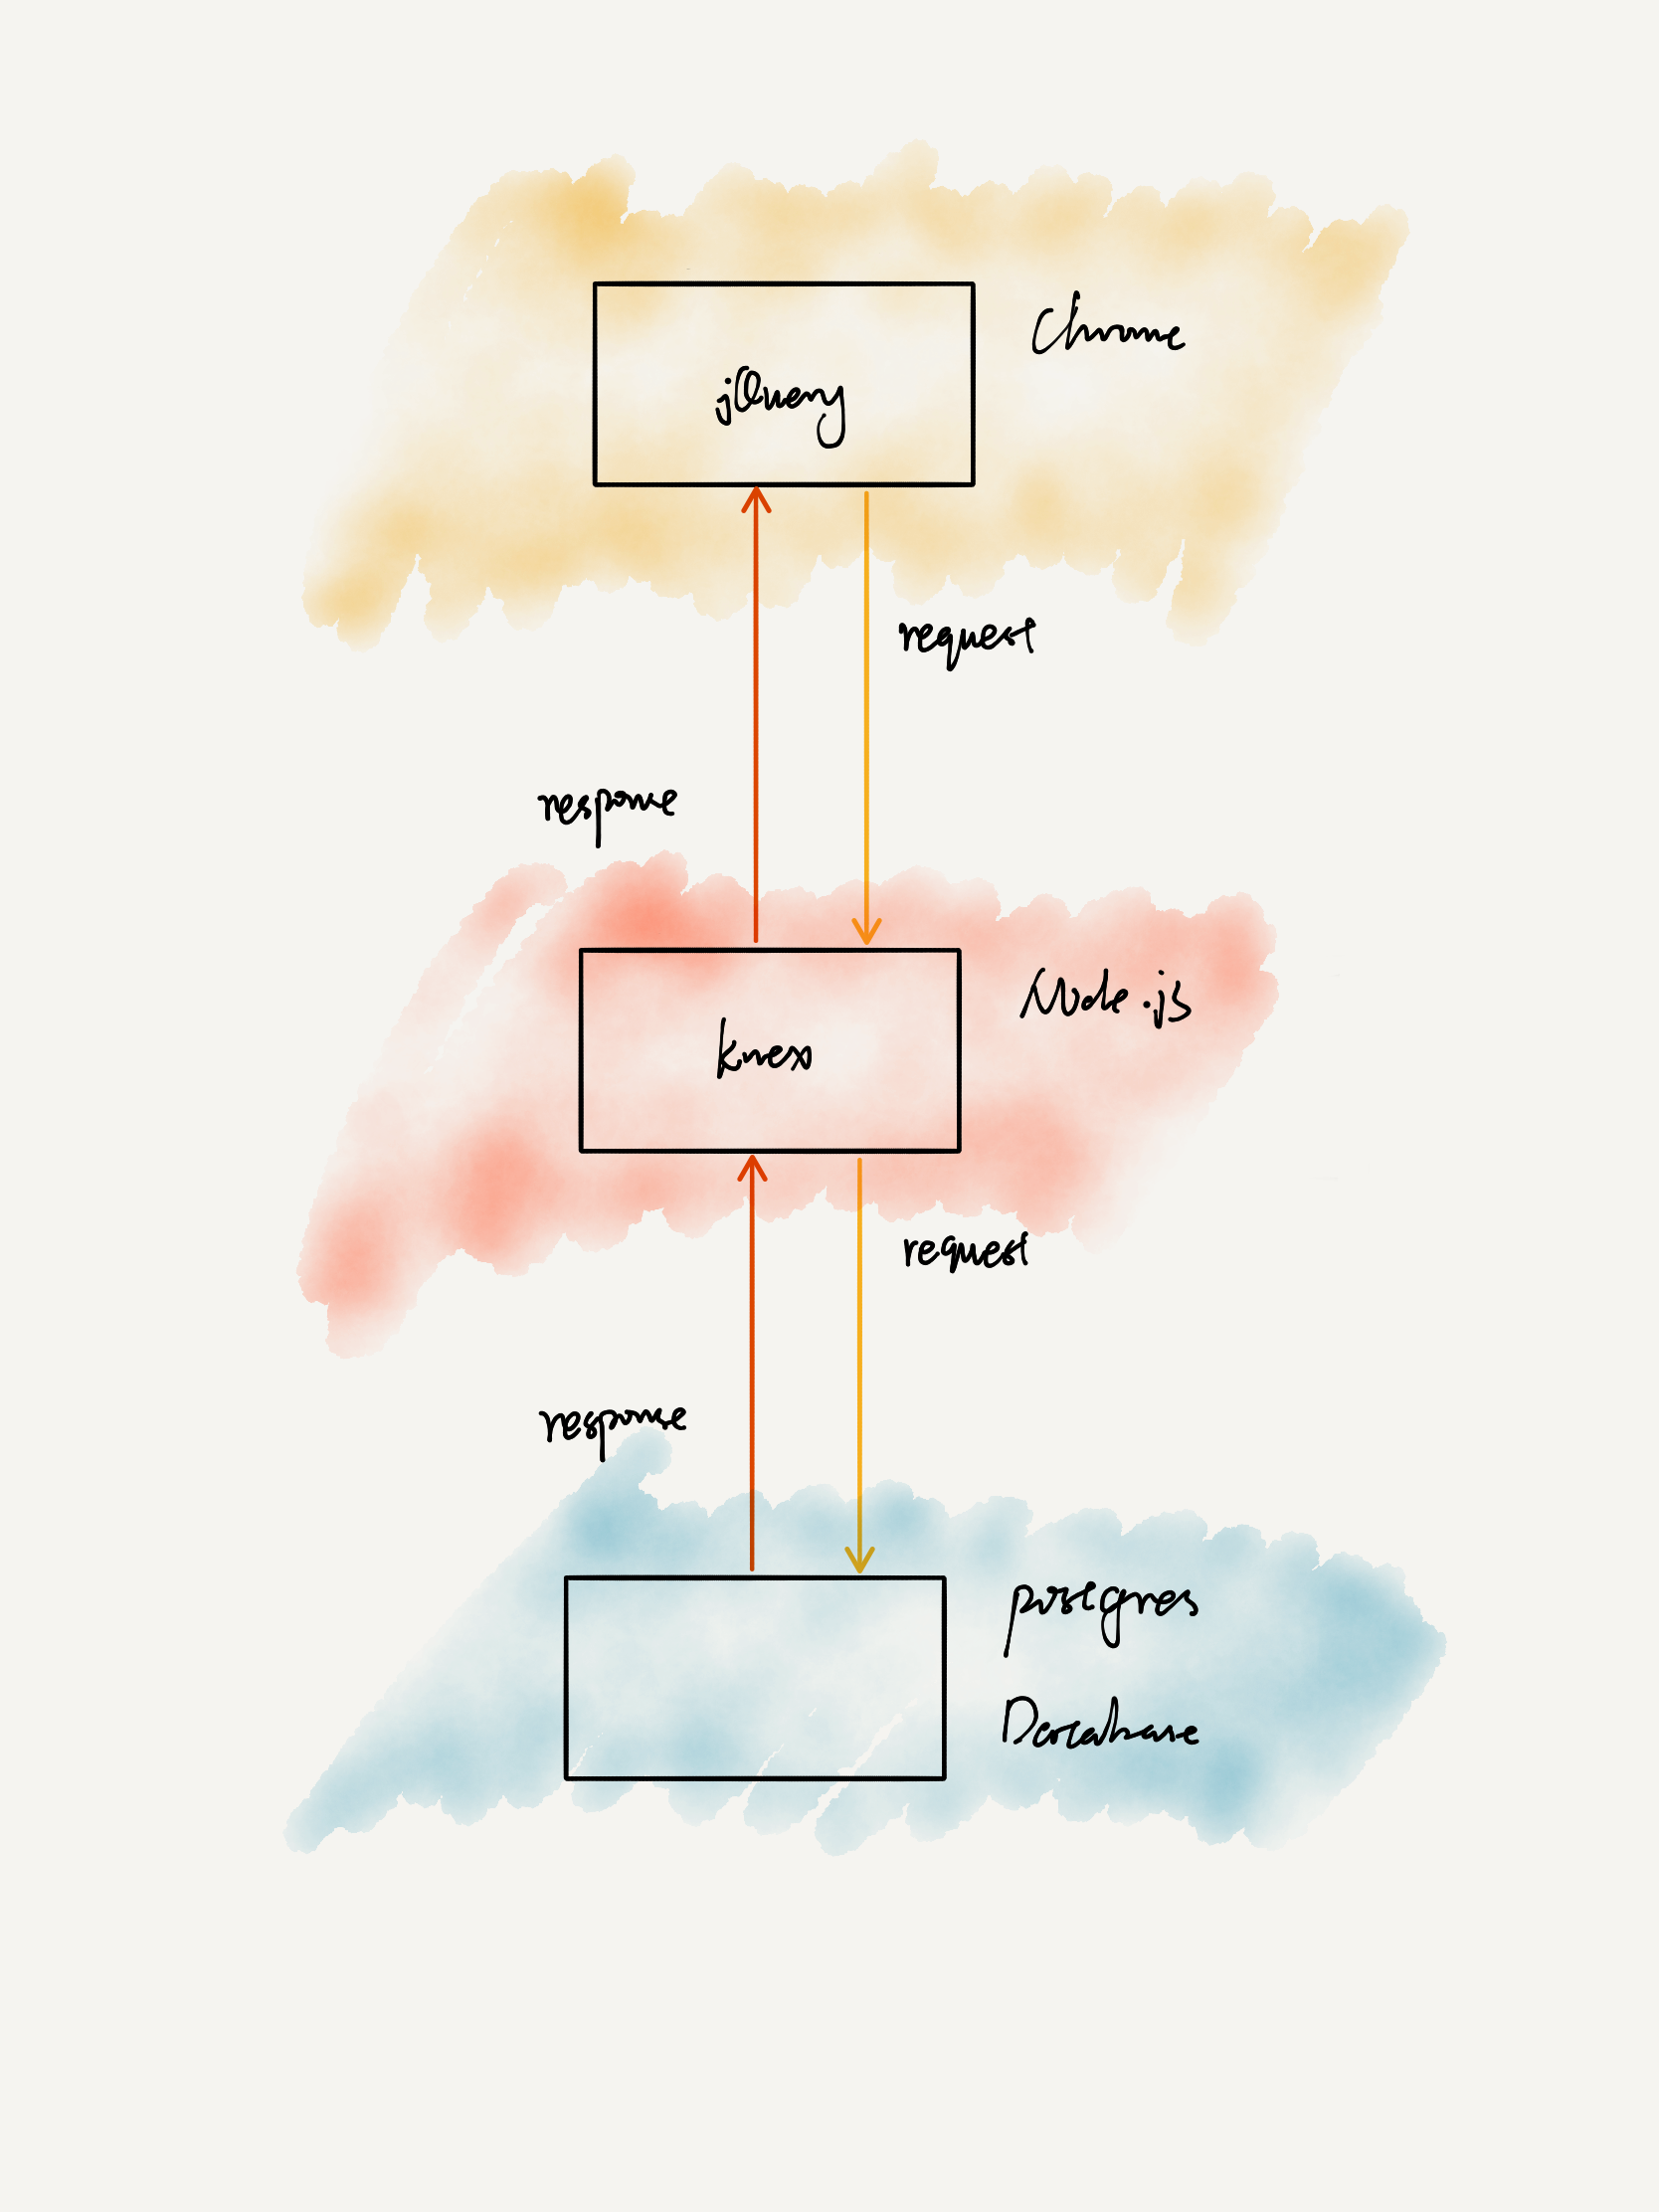
上周在阅读 Express.js Blueprints 时看到 Authentication 的部分,就想着使用 Koa 去复现一遍。于是在网上看到这篇文章 User Authentication with Passport and Koa 。文章给出了源代码和详细的步骤。其中不乏遇到自己不熟悉的知识领域,比如 knex,postgresql 和 redis 等等。写这篇文章的目的:一是熟悉下在 koa 框架下的程序结构;二是对于自己不熟悉的知识领域的一个总结。
需要通过 brew 安装:
- postgresql
- redis
使用 npm 全局安装:
- knex
文件结构,逻辑
文件最后的结构:
.
├── LICENSE
├── README.md
├── knexfile.js
├── package-lock.json
├── package.json
├── src
│   └── server
│       ├── auth.js
│       ├── db
│       │   ├── connection.js
│       │   ├── migrations
│       │   │   ├── 20170817152841_movies.js
│       │   │   └── 20190127152820_users.js
│       │   ├── queries
│       │   │   ├── movies.js
│       │   │   └── users.js
│       │   └── seeds
│       │       ├── movies_seed.js
│       │       └── users.js
│       ├── index.js
│       ├── routes
│       │   ├── auth.js
│       │   ├── index.js
│       │   └── movies.js
│       └── views
│           ├── login.html
│           ├── register.html
│           └── status.html
└── test
    ├── routes.auth.test.js
    ├── routes.index.test.js
    ├── routes.movies.test.js
    └── sample.test.js
有一些文件夹,文件属于自动生成的 boilerplate,比如 package.json,knexfile.js,db 文件夹里的一些内容。项目的结构清晰明朗。test 为测试文件夹。测试文件的标题统一加上 test 标示,并用 dot 分隔。这也提醒自己,文件标题的命名可以不使用 underscore 或 dash 来分隔,也可以用 dot。在 server 文件夹下,db 几乎都是数据库,knex 相关的。另外有路由 routes 文件夹和 views 视图文件夹。
Postgresql
在 macOS 上直接使用 Brew 安装即可。由于我个人不习惯开机自动启动数据库,那个需要用到类似 service start 的命令。这里是手动开启的办法:
$ pg_ctl -D /usr/local/var/postgres start
和 Mysql 一样,把 start 可以换成 stop,restart。
数据库初始化:
$ initdb /usr/local/var/postgres
在这篇教程里,需要我事先创建两个数据库,创建数据库用如下命令:
$ createdb koa_api
$ createdb koa_api_test
psql + Database,进入 database 的命令行。
\dt 显示所有 tables
Please note the following commands:
\listor\l: list all databases\dt: list all tables in the current databaseYou will never see tables in other databases, these tables aren’t visible. You have to connect to the correct database to see its tables (and other objects).
To switch databases:
\connect database_name` or `\c database_nameSee the manual about psql.
除此以外,还可以通过 Knex 来创建数据库。理论上,可以通过 Knex 来进行所有的数据库操作。
knex
Knex.js is a “batteries included” SQL query builder for Postgres, MSSQL, MySQL, MariaDB, SQLite3, Oracle, and Amazon Redshift designed to be flexible, portable, and fun to use.
– Knex.js
Knex,可以看作是各种不同数据库下统一封装的一套 API。通过 Knex 来和数据库进行交互。比如创建表,更新,添加数据等等。上文引用里提到了「battery-included」一词,意思是「开箱即用」,即这个 Library 已经包含了它所需要的全部依赖 Dependency。我们装完拿来直接用即可,不需要在进行其他 Library 的安装。
因为要频繁在 Terminal 里用到 knex 命令,所以最后事先全局安装 Knex。在这篇教程里,我们在使用 Postgresql 创建完数据库以后,会看到需要我们执行这两条命令:
$ knex migrate:latest --env development
$ knex seed:run --env development
Tips:
如果不想要全局安装 Knex,依然想在 Terminal 运行。在生成的 node_modules 文件夹下会有个隐藏文件夹 .bin,里面包含了全部我们可以直接运行的 package。所以直接:
$ node_modules/.bin/knex init
init 之后,本地会自动生成一个 knexfile.js 文件。里面大致是些 boilerplates。在这篇教程给的 source code 里, knexfile.js 已经针对 postgresql 配置完毕。但这里要明白 migration 和 seed 两个操作。
Migrations are a way to make database changes or updates, like creating or dropping tables, as well as updating a table with new columns with constraints via generated scripts. We can build these scripts via the command line using
knexcommand line tool.
例如,通过 knex 创建 table:
$ knex migrate:make users
这里会自动生成一个 users.js 文件,文件名前面还会有 time stamp。存储路径在 ./server/db/migration/。所有的文件夹都会自动生成。在新生成的文件,我们需要定义新建的这个 table 各个 field 属性。例如在这篇文章的例子里,新建了 users table,定义属性如下:
exports.up = (knex, Promise) => {
  return knex.schema.createTable('users', (table) => {
    table.increments();
    table.string('username').unique().notNullable();
    table.string('password').notNullable();
  });
};

exports.down = (knex, Promise) => {
  return knex.schema.dropTable('users');
};
通过下面这条命令来应用我们定义的属性:
knex migrate:latest --env development
To run the migration, use the command:
knex migrate:latestThe default environment is development, which works for us here, but if you need to specify a different environment, such as a test environment, then you can use the env flag in the migration command like:
knex migrate:latest --env test
development 是我们事先在 knexfile.js 里定义好的。可以理解为对于 database 的映射。从上面定义的属性中,可以很轻松的知道这个 table 有两个 field,分别是 username 和 password。以及每个 field 的属性都通过 chain function 的形式来表达。
Similar to migrations, the
knexmodule allows us to create scripts to insert initial data into our tables called seed files! If we have relations on our tables, the seeding must be in a specific order to so that we can rely on data that might already be in the database.
seed 是用来初始化数据的。同 migrate 一样:
$ knex seed:make users
$ knex seed:run --env development
line 1 会自动创建一个 user.js 在路径 ./server/db/seeds/ 里。line 2 运行这个 seeds,对 table 里数据进行初始化。
Mocha.js , Chai.js
一个测试 module 被称为 specification,简称 spec,结构如下图所示:
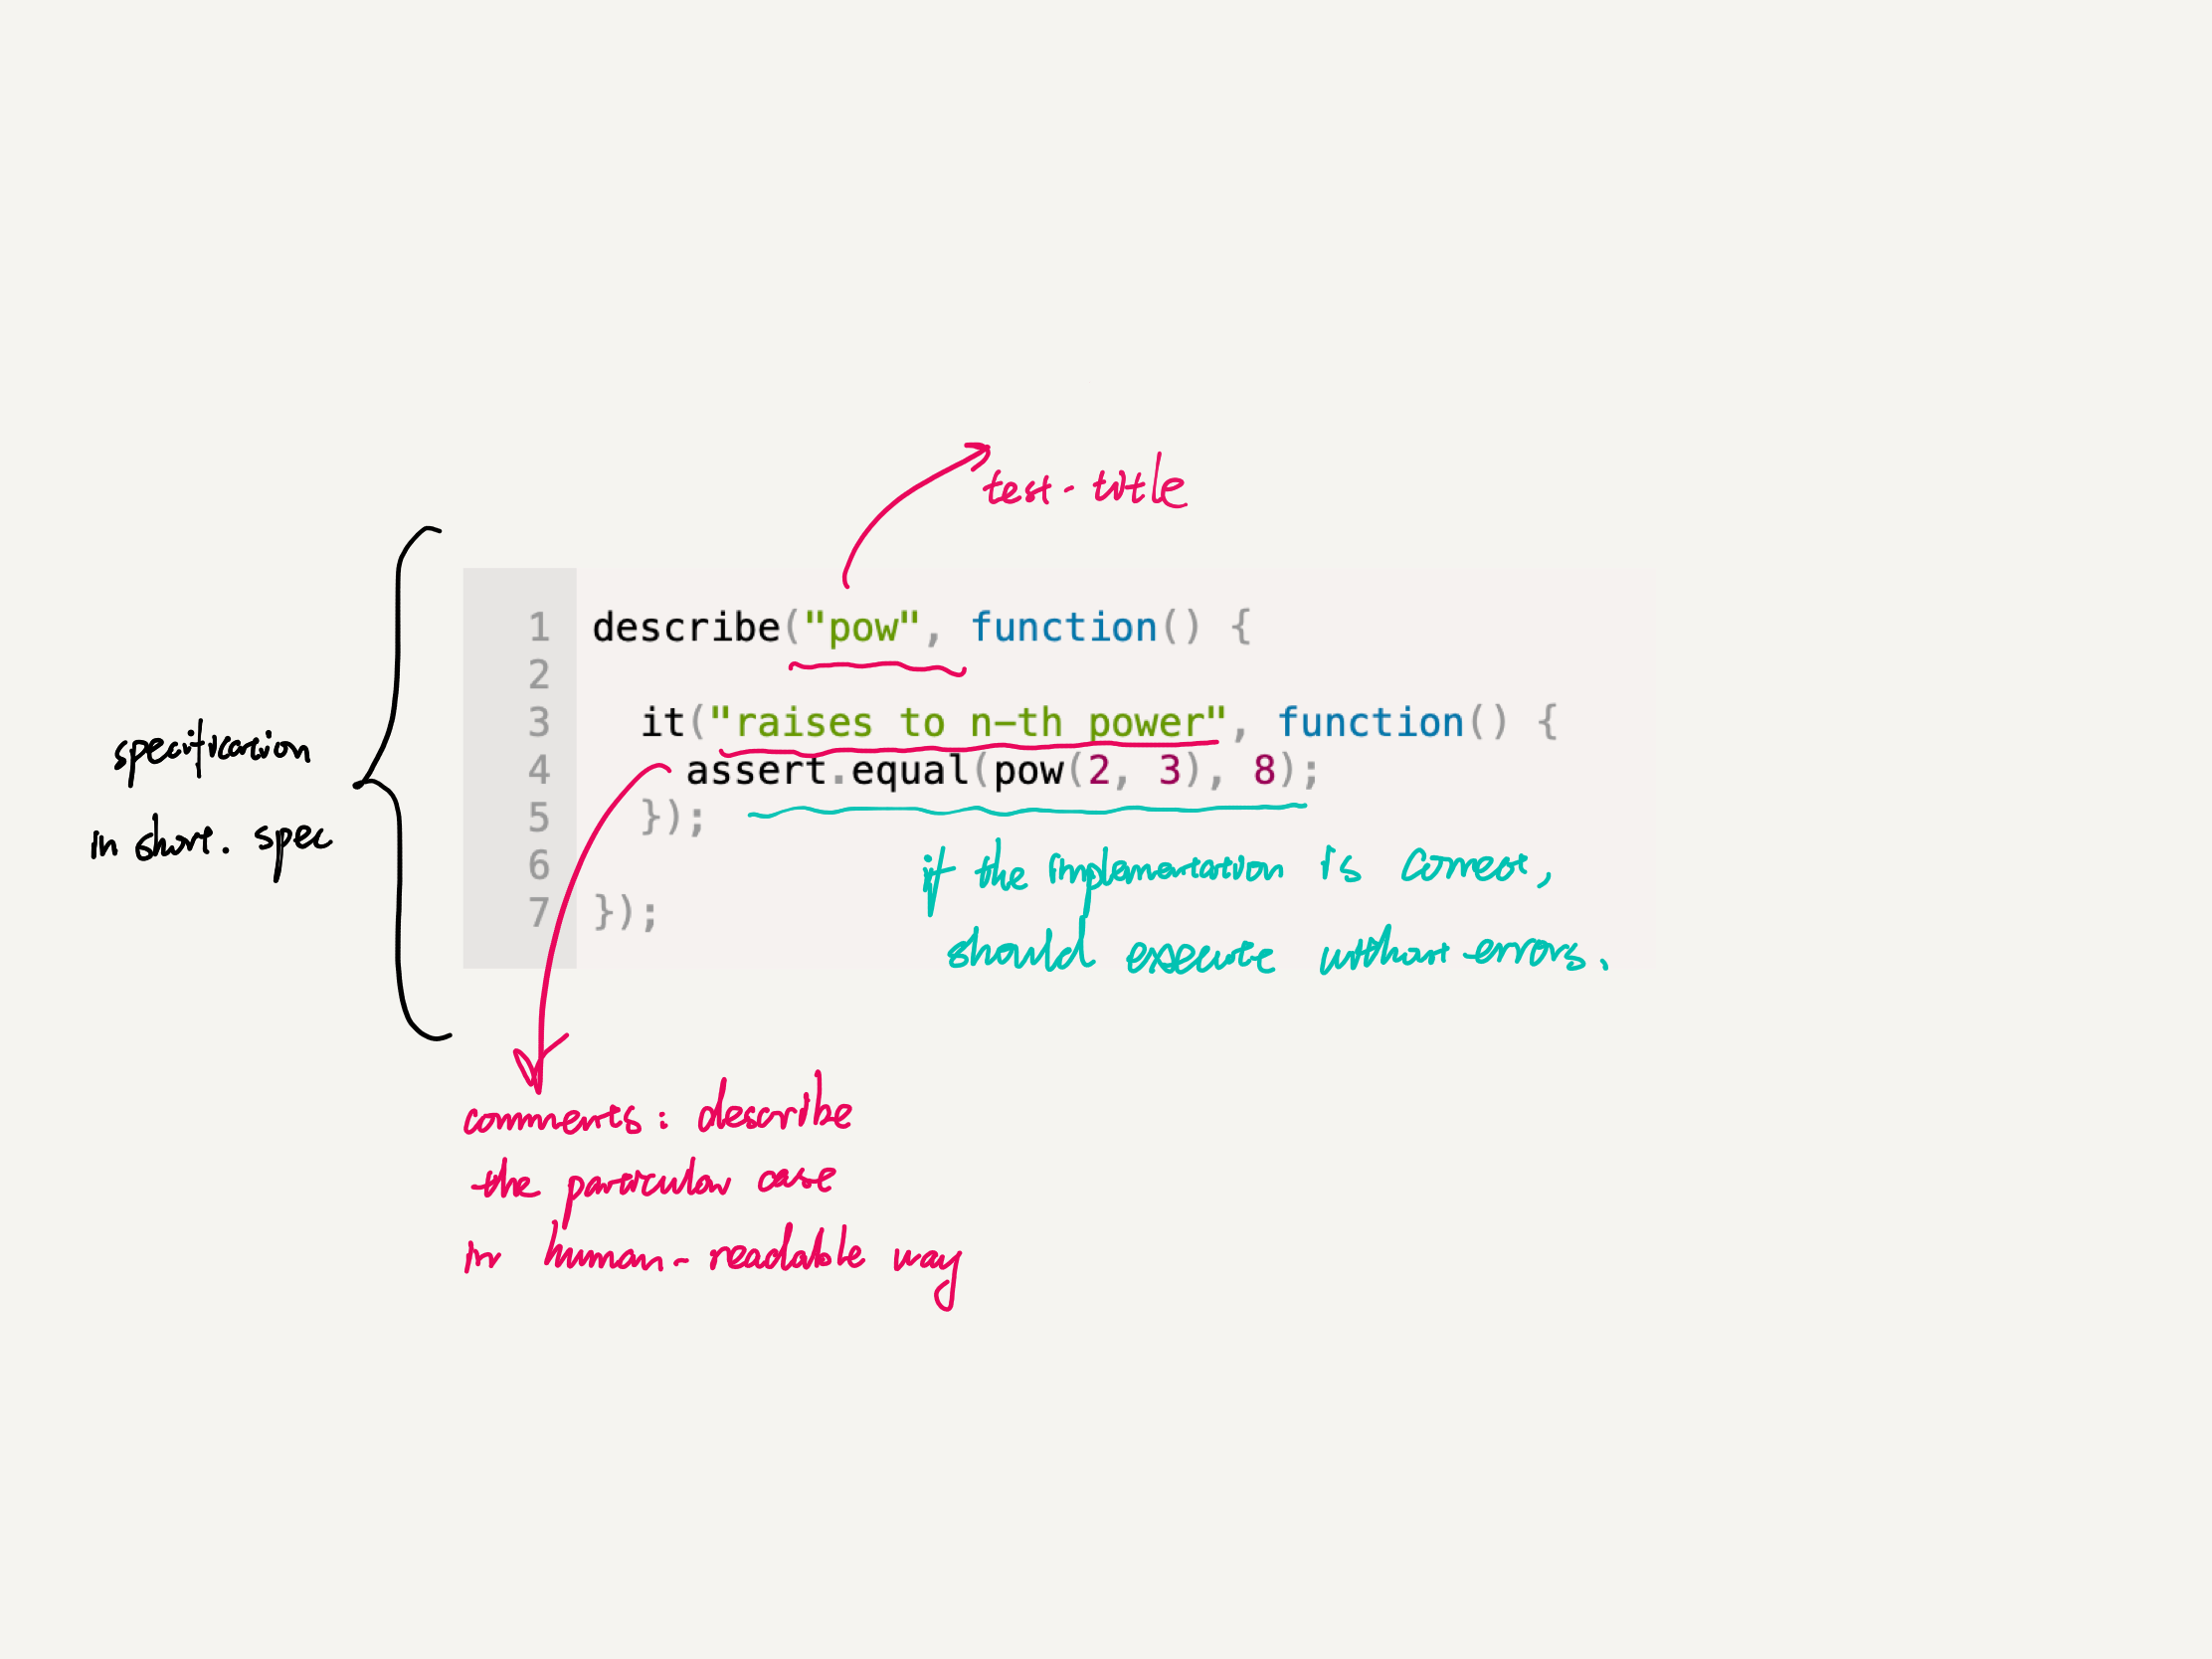
在这篇教程中,用到 Mocha 和 Chai 两个测试 Library。
使用 Mocha 进行测试,运行 Mocha,它会自动找项目目录里 test 文件夹下的文件运行。
Mocha automatically looks for tests inside the
**test**directory of your project. Hence, you should go ahead and create this directory in your project root.
以下是写的一个很简单的小例子:
const assert = require('assert');

describe("sample", ()=>{
    it("it's just a test", ()=>{
        let x = 5;
        let result = x;
        assert.equal(Math.pow(x, 1), result);
    });
});
在 Terminal 里运行:
$ node_modules/.bin/_mocha

  sample
    ✓ it's just a test


  1 passing (6ms)
Chai 的作用是提供了更多测试的方法。例如教程里测试是否 render view 成功:
describe('GET /auth/register', () => {
  it('should render the register view', (done) => {
    chai.request(server)
    .get('/auth/register')
    .end((err, res) => {
      should.not.exist(err);
      res.redirects.length.should.eql(0);
      res.status.should.eql(200);
      res.type.should.eql('text/html');
      res.text.should.contain('<h1>Register</h1>');
      res.text.should.contain(
        '<p><button type="submit">Register</button></p>');
      done();
    });
  });
});
其主要内容检测返回的 res 里有没有想的 DOM Node 。当然,前提还是去验证返回代码是否是 200, 返回文本类型这些。
Redis, Session
这篇教程的最后介绍了 redis,把用户的 user 信息从 memory 中拿出来存进 redis 里。这样当关闭浏览器,短时间再重新打开时,不需要重新输入用户名密码进行登录。
It’s a good idea to move session data out of memory and into an external session store as you begin scaling your application.
Redis 同样也是数据库 Database,但不同于之前接触的 MySql,Postgresql,Redis 属于 in-memory database。看了 Wikipedia 的解释。in-memory database 主要依赖于内存 memory,而不是通常的外存 storage。
关于 session 和 cookie 的区别。
cookie 是存储在 client 端的,通常是一些偏好设定,比如颜色啊等等,通常不会有敏感信息。session 存储在 server 端,因为 http 通信是无状态的。session 用来保存 client 和 server 之间的通信状态,以及 client 可能会访问多个不同的页面,这些页面都在这一个 server 上,通信的双方并没有变化,通过 session 在不同的页面共享数据。
A session is a unit of maybe variables, state, settings while a certain user is accessing a server/domain in a specific time frame. All the session information is in the traditional model stored on the server (!)
Because many concurrent users can visit a server/domain at the same time the server needs to be able to distinguish many different concurrent sessions and always assign the right session to the right user. (And no user may “steal” another uses’s session)
这里首先用到两个 middleware,koa-session 和 koa-redis。koa-session 是 koa 基础的 session 管理 middleware。通常 session 是存储在 memory 里的,通过 koa-redis 将 session 存储在 redis 里。
把 session 存储在 redis 的优势:
Redis is perfect for storing sessions. All operations are performed in memory, and so reads and writes will be fast.
The second aspect is persistence of session state. Redis gives you a lot of flexibility in how you want to persist session state to your hard-disk. You can go through http://redis.io/topics/persistence to learn more, but at a high level, here are your options …
依旧是通过 brew 安装 redis。
redis 启动:
$ redis-server /usr/local/etc/redis.conf
redis 关闭,直接 ctrl + C 或是:
$ redis-cli shutdown
参考:
- Knex.js
- Seed Knex PostgreSQL Database with JSON Data
- l4nk332/stuff - Github
- 「batteries-included」该怎么翻译比较好? - 知乎
- Migrations & Seeding
- Automated testing with mocha
- Run mocha tests in test environment? - StackOverflow
- A quick and complete guide to Mocha testing
- What is the difference between a Session and a Cookie? - StackOverflow
- How safe is it to store sessions with Redis?
- Install and config Redis on Mac OS X via Homebrew